Spacecraft: Creating a Spacecraft
Starting a New Project
Opening Nominal Studio will present an empty project. A new project can be created at any time via File → New Project. A project can be named by editing the text near the right side of the upper toolbar.

Navigating the Interface
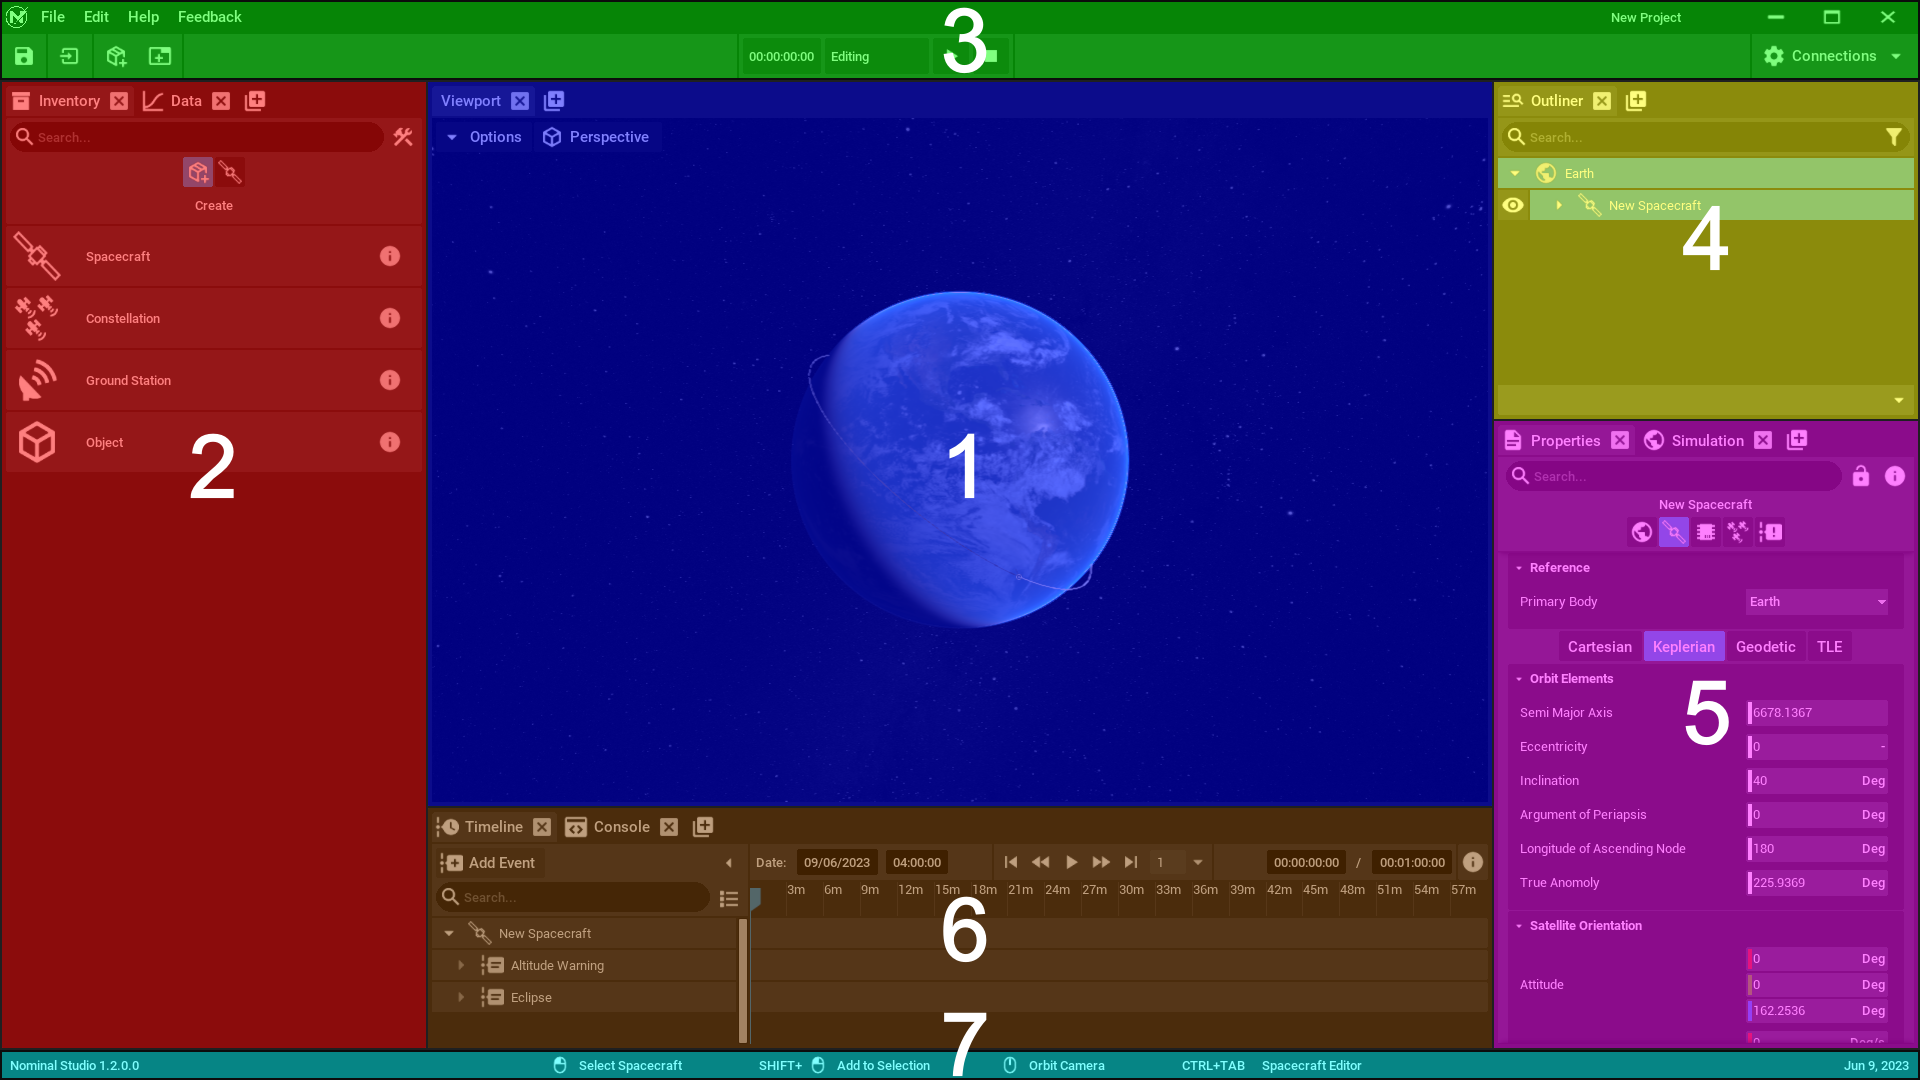
The default interface contains 7 front-facing panels. These constitute the most common elements you will use for configuring and running a simulation. Additional panels can be added to the window using the + icon on the right of each widget.

1. This is the viewport. The 3D visualization of the simulation is shown here. There are options for enabling different view modes which is important for appending your spacecraft’s hardware.
2. This is the inventory. All of your imported components, spacecraft, and other entities are available here. While editing the project these items are what you will use to spawn new entities and append hardware.
3. This is the toolbar. This gives you access to window functions and saves/load functionality. There are convenient buttons on the lower side for saving the project, importing other projects, viewing package information, and creating a new window. This also shows the current simulation time and is where you start and reset the simulation.
4. This is the outliner. Spacecraft and other entities are listed here and can be grouped through different methods. The Outliner is one way to select different items for editing.
5. This is the properties panel. Here you will have access to all properties available on the selected items. This is where you will configure components, edit spacecraft orbits, enable atmospheric drag and so on.
6. This is the timeline. Any events that occur in your simulation will be tracked here. Custom events can be added here that are associated with simulation objects.
7. This is the status bar. This will display any important messages such as events executing, along with the current version of Studio being executed.
Configuring a Spacecraft
A spacecraft can be created by pressing the Spacecraft button on the inventory panel. This will spawn a spacecraft in orbit around Earth, however, this spacecraft will have no components or functionality. Press the hammer button on the right side of the search bar in the Inventory to switch into edit mode (or CTRL + TAB with the mouse over the viewport).

In edit mode the inventory updates with the components available for a spacecraft. These will include the default assets provided with Studio, along with any imported components.
Note
Using the default and custom components will not be shown in this tutorial. Please see the later tutorials on how to use these components and import custom components into Studio.
The Chassis category will be displayed first as it contains the first type of component that must be added. All other components will attach to the chassis. Pick a chassis and click on it to have it applied as the root component. In this example, the 3U Chassis will be used, which is a 3-unit cube-sat. There are a few components that are required for an operational spacecraft. These include:
- Solar Panel
- Reaction Wheels
- Battery
- Guidance Computer

Note
When adding the guidance computer to the spacecraft, it is best practice to ensure that the reaction wheels have already been added. The computer requires this as a dependency and if they do not exist, then the computer will display a warning on the screen.
With the spacecraft basic configuration completed, return to the planet view with the same button that was used to enter edit mode with (or CTRL + TAB with the mouse over the viewport). The outliner now has a breakdown of the components on the spacecraft, and components can be selected here without having to zoom in on the spacecraft. Press the spacecraft tab in the properties panel and spacecraft parameters can be identified. By hitting play, the simulation will simulate a basic spacecraft orbit. In the next document, orbital parameters for the spacecraft will be configured.